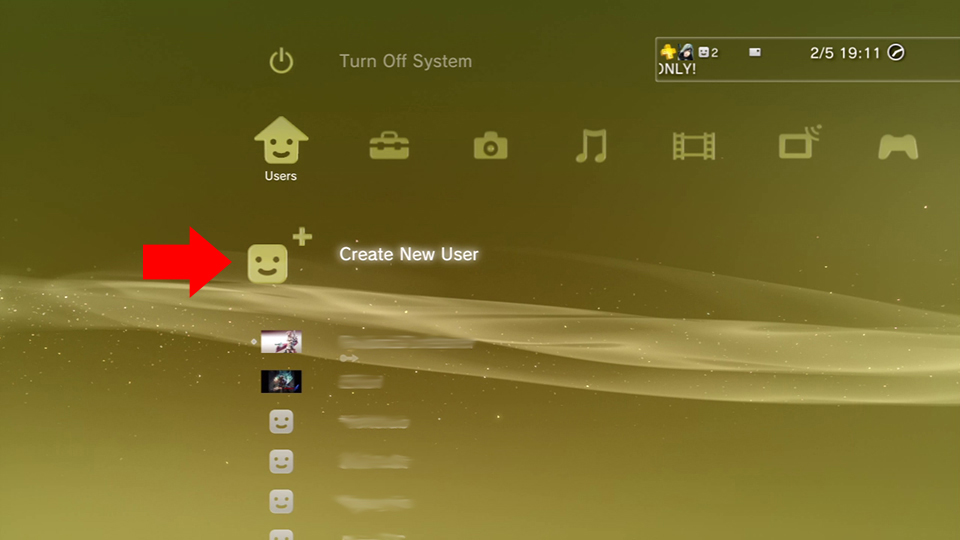
 Step 1: Create a new user on your PS3 by going to the far left of the XMB menu and selecting the second option from the top: “Create New User.”
 Then enter your new user name. [*Note: This does not have to be the same name as the PSN account name you plan to choose. Any name is fine and it can be changed at any time in the future.]
 Step 2: Log in as the user you just created by selecting it in the same left-most column of the XMB.
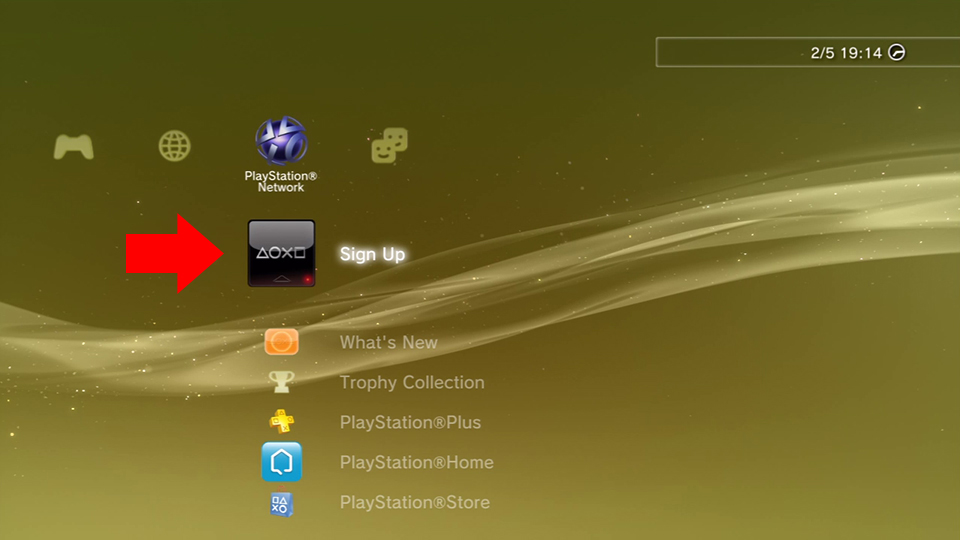 Step 3: Once logged in, go to the “PlayStation Network” icon on the XMB and select “Sign Up.”
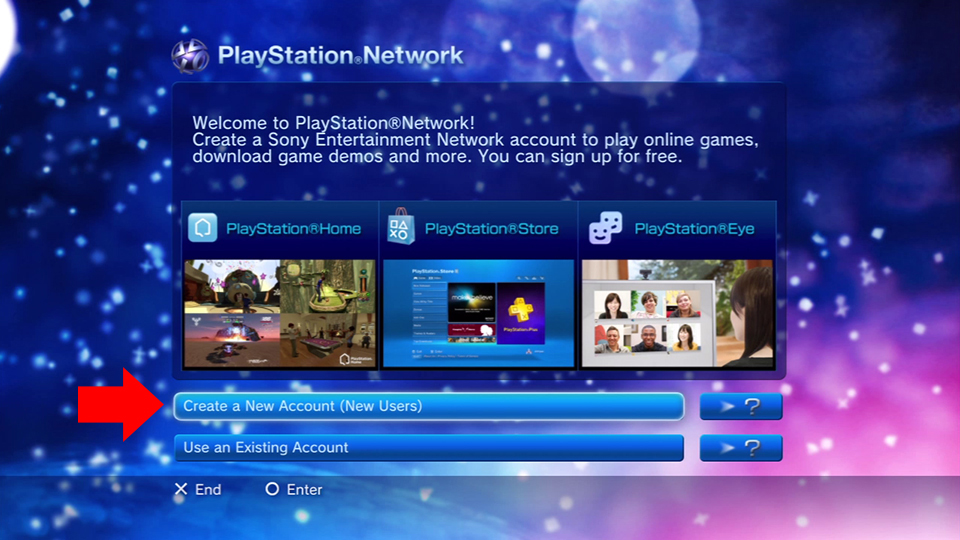 Step 4: In the new window that appears, select “Create a New Account (New Users).”
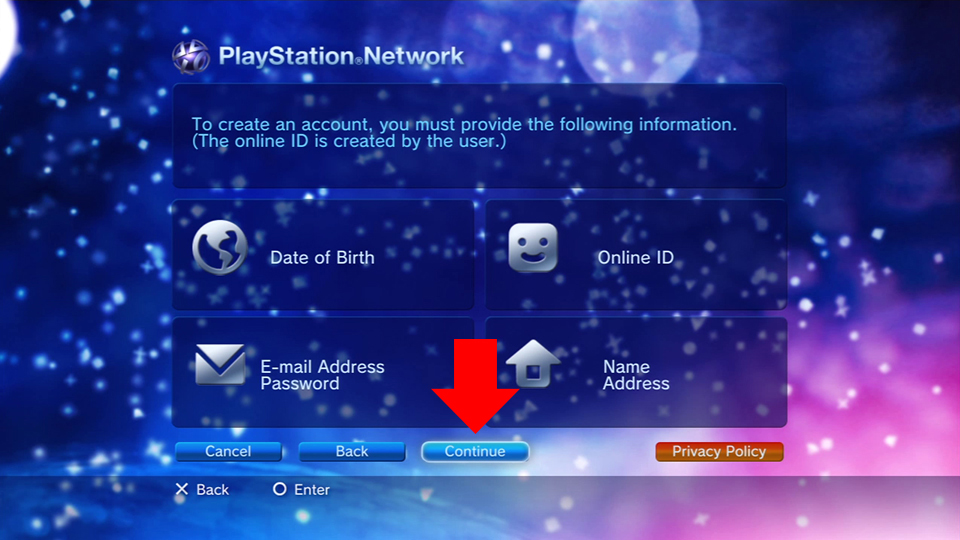 Step 5: Select the “Continue” button.
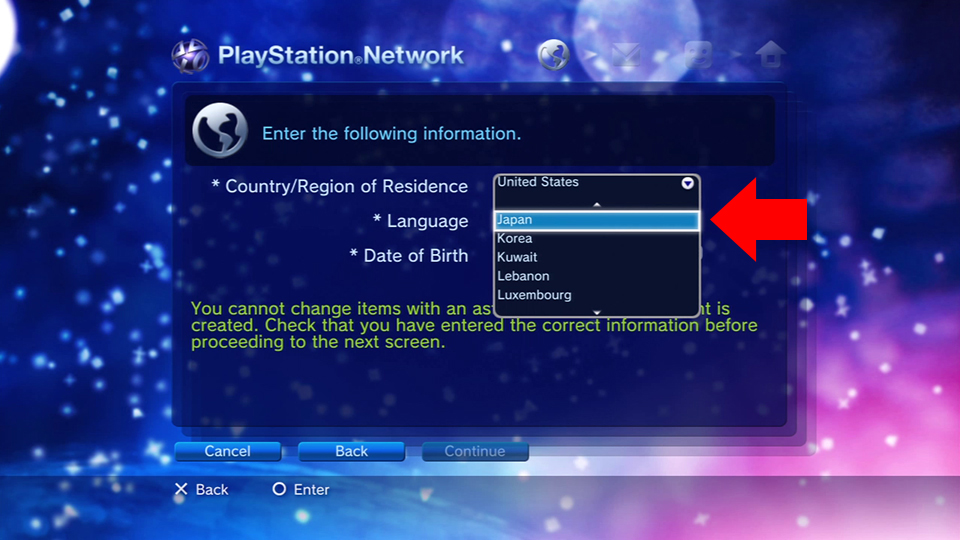 Step 6: Select “Country of Residence” and in the dropdown menu that appears, select “Japan.”
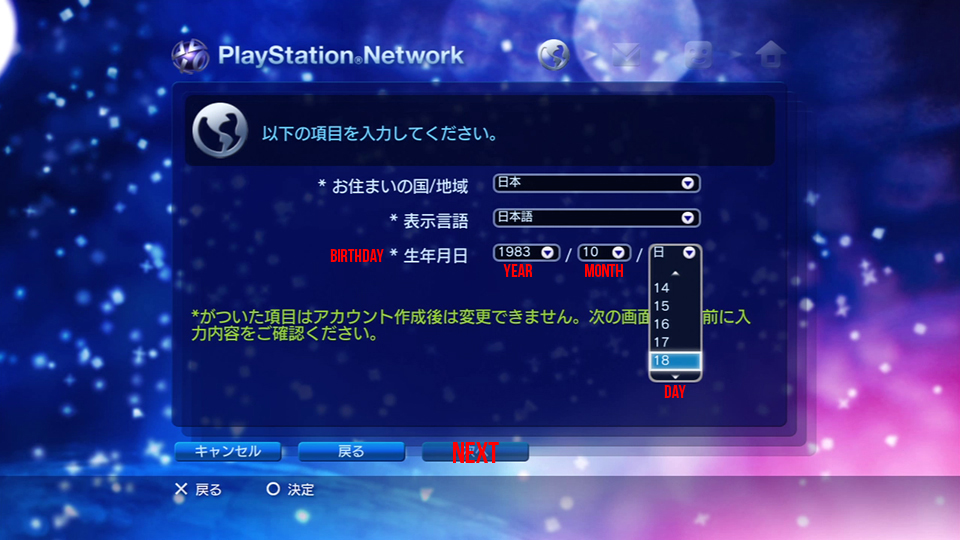 Step 7: Now this should change everything into Japanese. From here on out, no more English for you. Go down to the third option. It’s asking for your date of birth. Select first your year, then month, then day from the dropdown menus that appear. Then push the “Next” button (the right-most button along the bottom.)
 Step 8: Scroll through the licensing agreement (or just hit “Right” on the D-pad) and select “Agree,” (the right-most button).
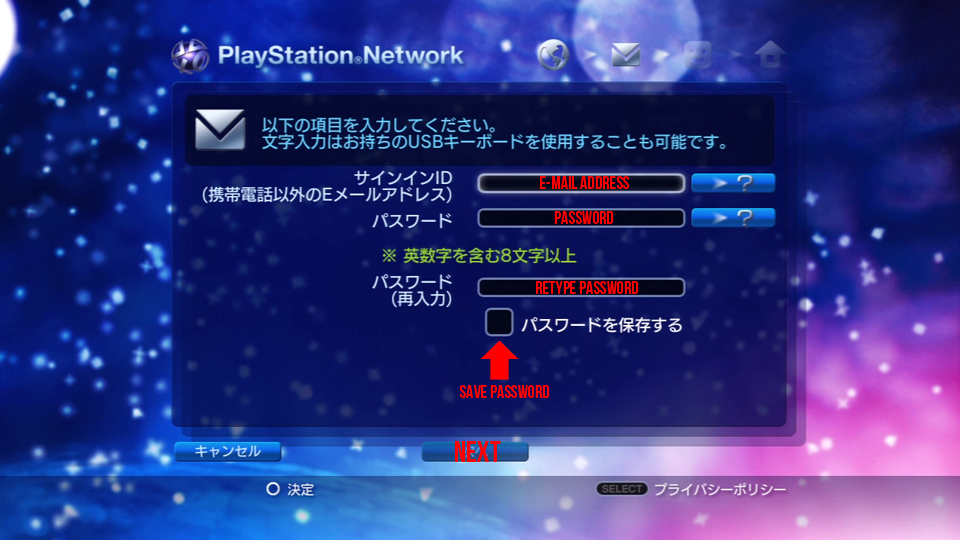 Step 9: This next screen is asking for your email information. In the first box, put in the email address you want to use with this account. [*Note: It can’t be the same email used by your US PSN account and should definitely be a real email you can check in case you need a password reset or something in the future.]
In the second box, type your password. In the third box, type your password again. [*Note: The password must be 8 letters long, have at least 1 number, and must not have the same letter 3 times in a row. It also can’t be the same as your email address.]
Check the small box under your password to save it so you won’t have to retype it every time you want to log in to the PSN. Then push the “Next” button (the right-most button along the bottom.)
 Step 10: Type in your desired PlayStation Network ID. This will be the username for your account (and thus your multiplayer name if you play any games online). If that ID is free, continue on. If you get an error message with some red text, try again as the name you chose is already taken. When you have a username you like, press the “Next” button (the bottom right-most button).
 Step 11: Now it’s time to enter your personal information. In the first box, put your last name. [*Note: Press the “Select” button three times in the text entry screen to get to normally spaced English letters.]
In the second box, put your first name. Finally, in the third box pick your gender from the dropdown menu. Male is the top option, female is the bottom one. Select the “Next” button (the right-most button along the bottom) to continue.
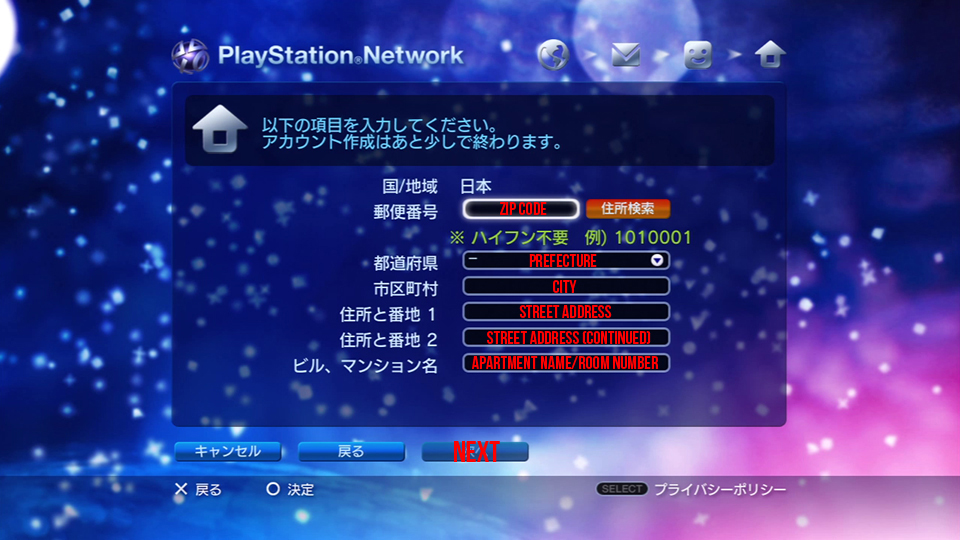 Step 12: This page is your address information. In the top box put in your Japanese zip code. [*Note: If you click the orange button next to the zip code box after putting in your zip code, it will deduce most of your address for you and fill in some of the following boxes.]
In box 2, choose your prefecture from the drop down list. In box 3, put the name of your city. In box 4, put your street address. If you need more room for your address, put the other half in box 6. And finally, in box 7, put your apartment name and room number if you don’t have a house. Select the “Next” button (the right-most button along the bottom) to continue.
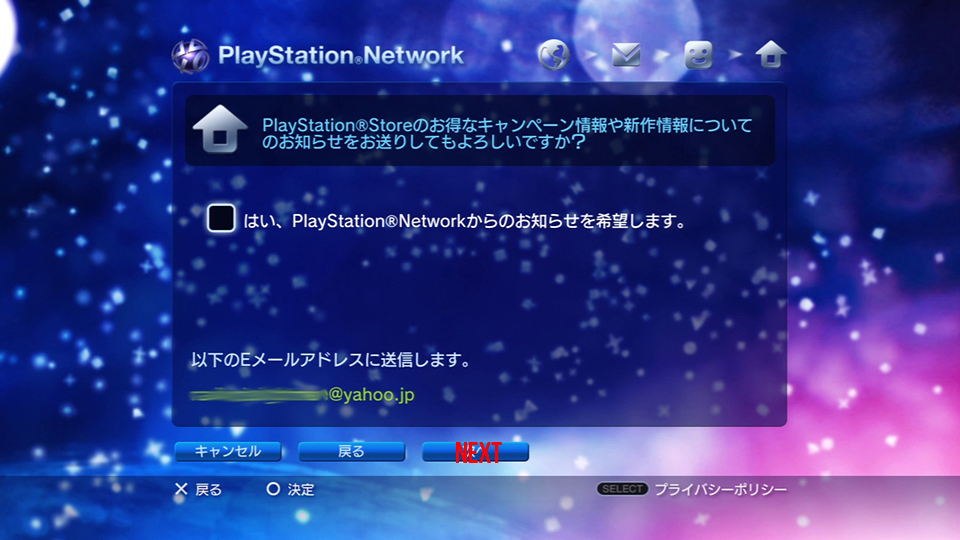 Step 13: Check the checkbox if you want info and newsletters about the Japanese PSN sent to the email address you registered in step 9. Then hit the “Next” button (again the bottom right-most button).
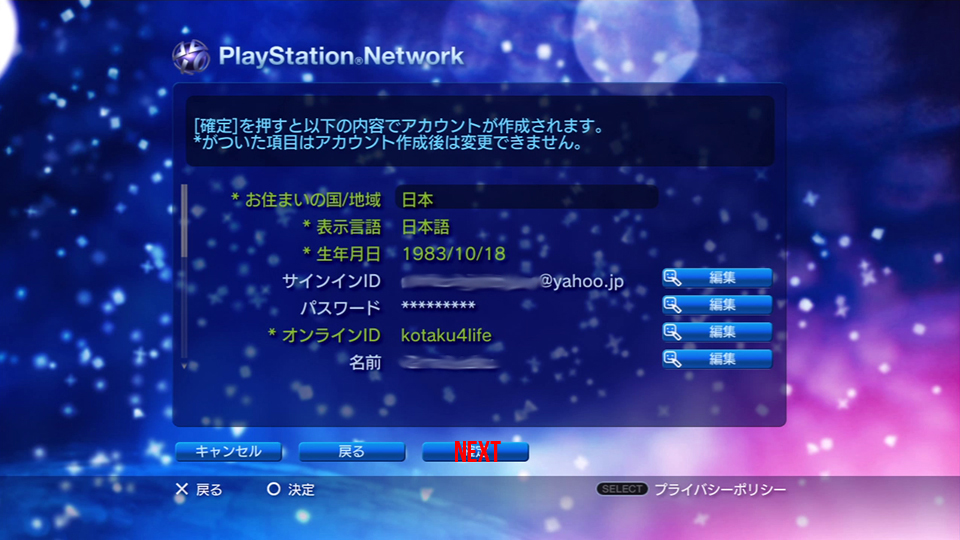 Step 14: Review your information and make sure it is correct. When you are sure it is, scroll to the bottom to leave the scroll box and click “Submit” (the bottom right-most button).
Step 15: That should do it, you now have a Japanese PSN account. Hit “Circle” on your controller to go to the PSN store. Hit “X” to return to the XMB menu. [*Note: Because the language of your PS3 is set to English, everything in the XMB will be in English. When you enter the PSN store it will all be in Japanese however.]
Part 2: Putting Cash in Your PSN Wallet
To buy games on the Japanese PSN, you’ll need to navigate some form of payment. The easiest way is to buy a Japanese PlayStation Network Card. Most will email you the code directly so you won’t even need to wait for the card to arrive.
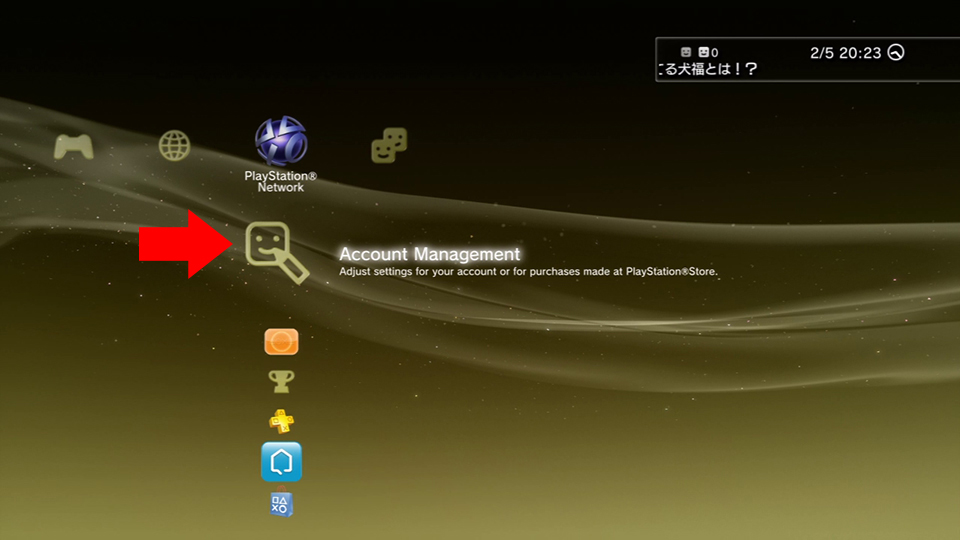 Step 1: Go to “PlayStation Network” in the XMB and click “Account Management.”
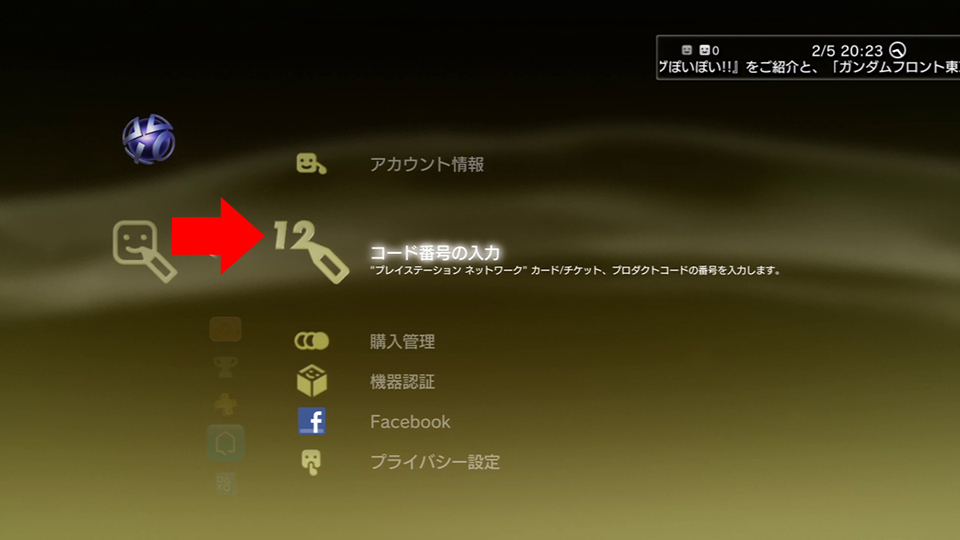 Step 2: Click the second option from the top.
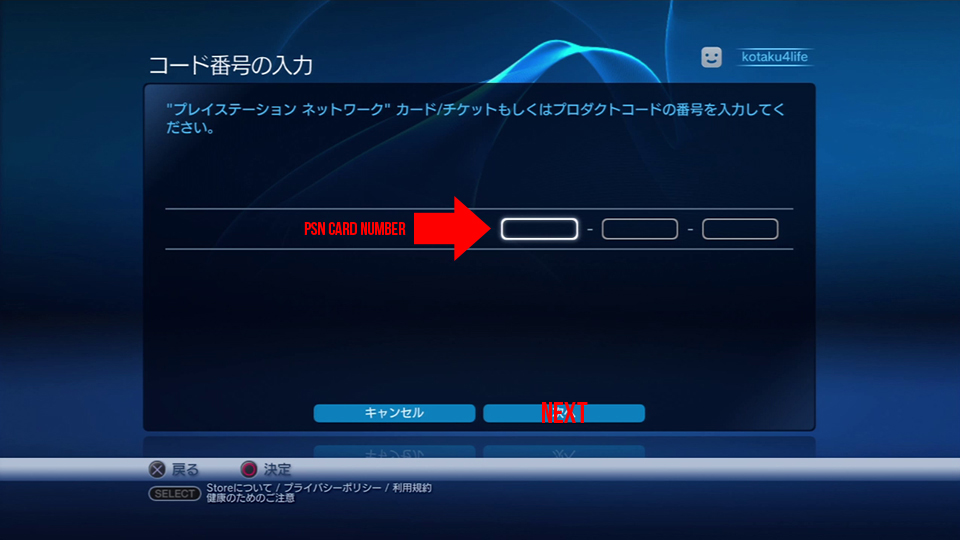 Step 3: Enter the code of your PSN Card four digits at a time. Hit the “Next” button when you are done (the bottom right button). When it asks for conformation on the next screen, hit the bottom right button again. Congratulations, you now have money in your Japanese PSN account. You can now head back on into the store (go to “PlayStation Network” in the XMB and click “PlayStation Store”) and start shopping!
Part 3: Downloading Demos on the Japanese PSN Store
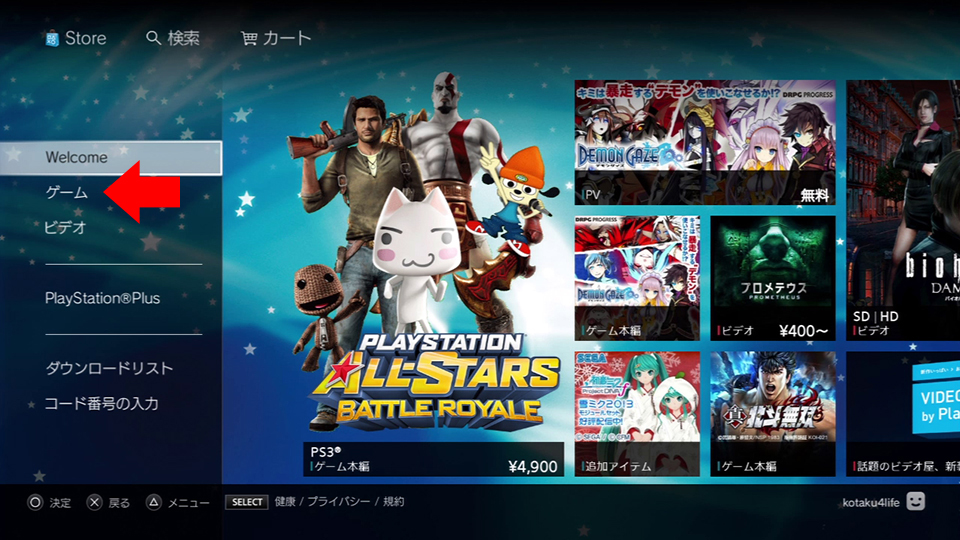 Step 1: In this first menu, select ゲーム (“game” in Japanese) which is the option under “Welcome.”
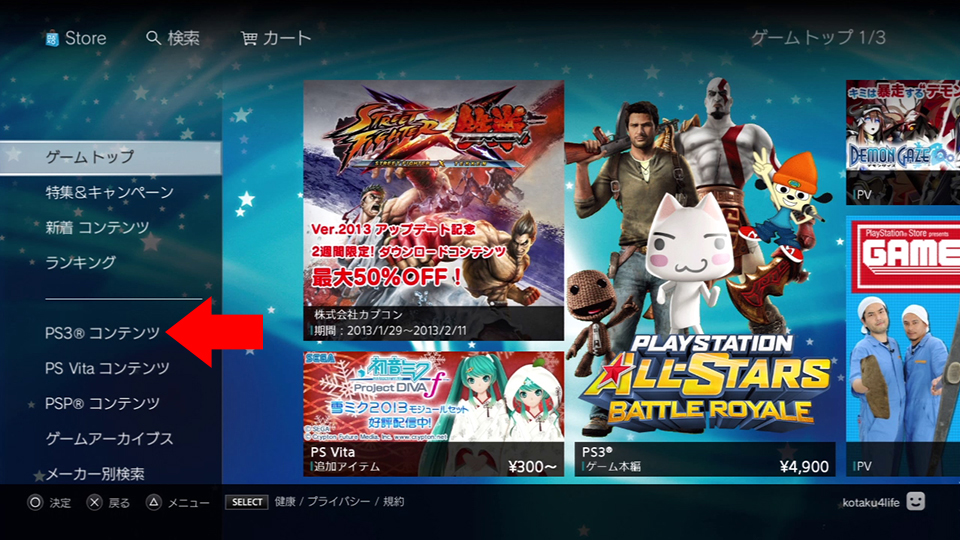 Step 2: The options you are looking for on this new list are the fifth, sixth, and seventh. PS3コンテンツ (content) is the PS3 game catalog while PS Vita コンテンツ (content) and PSP コンテンツ (content) are the Vita and PSP catalogs, respectively. For the sake of this guide, select PS3コンテンツ (content).
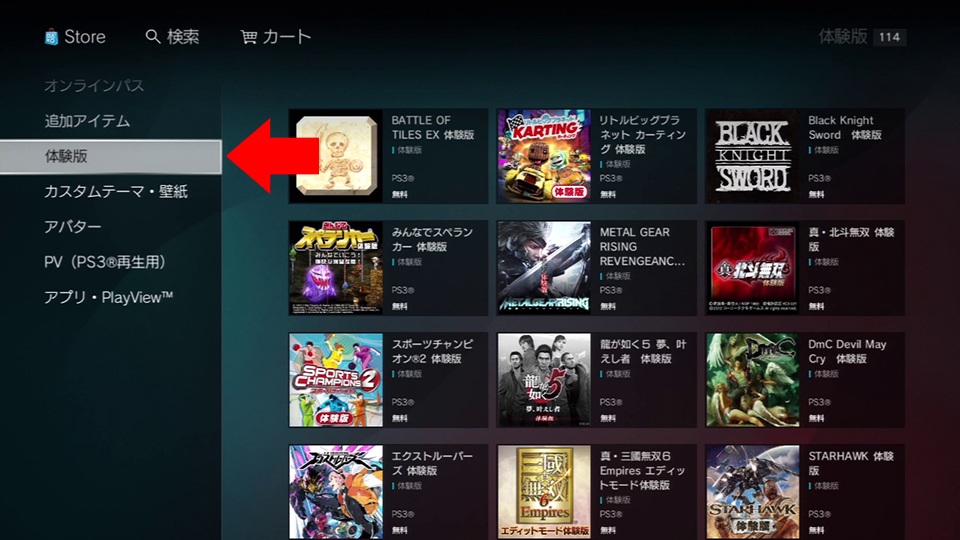 Step 3: To find a demo to download, click the fifth option on the list, 体験版 (demos). Now you can browse through all the PS3 game demos you can download from the Japanese PSN. [*Note: You can do the same basic steps for the Vita and PSP catalogues as well since they are organized identically.]
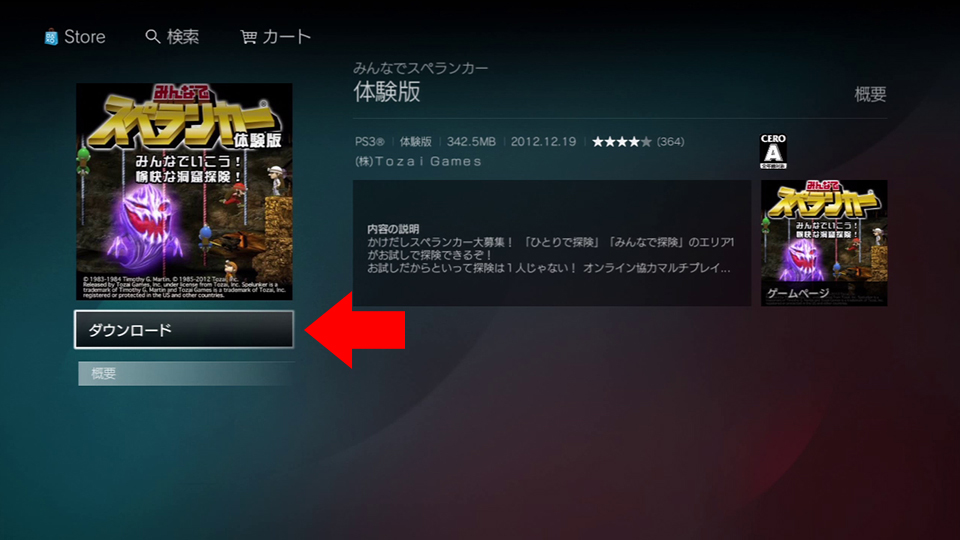 Step 4: To actually download the demo, simply click on the icon of the demo you want and then, in the new window that pops up, click the default option, ダウンロード (download) to begin your download.
Part 4: Buying Games on the Japanese PSN Store
Step 1: In this first menu, select ゲーム (“game” in Japanese) which is the option under “Welcome.” [*Note: Exactly like in Part 3: Step 1.]
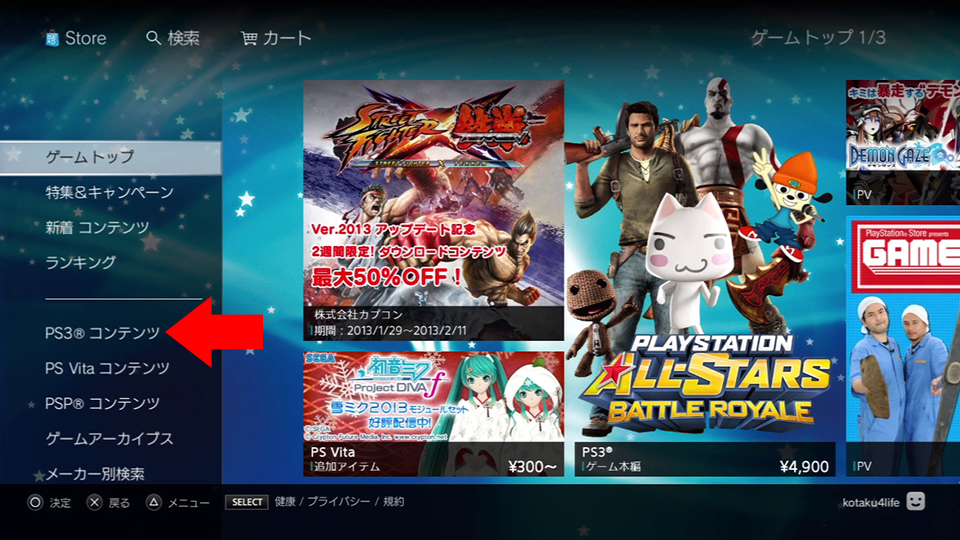 Step 2: The options you are looking for on this new list are the fifth, sixth, and seventh. PS3コンテンツ (content) is the PS3 game catalog while PS Vita コンテンツ (content) and PSP コンテンツ (content) are the Vita and PSP catalogs, respectively. For the sake of this guide, select PS3コンテンツ (content).
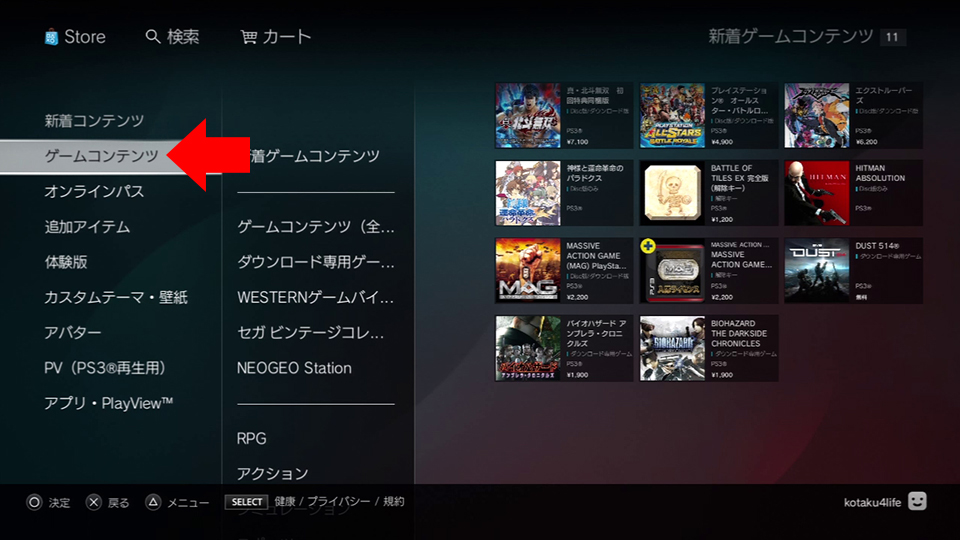 Step 3: For a list of all the PS3 games available for purchase on the PSN, select the second option on the list, ゲームコンテンツ (game content).
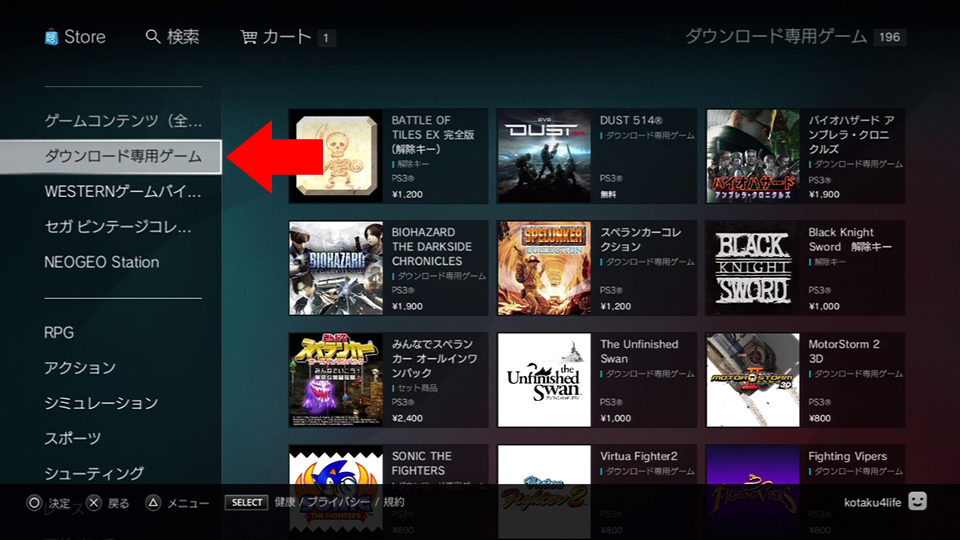 Step 4: Then click the third option from the top, ダウンロード専用ゲーム (downloadable games), on the menu that pops up. [*Note: If you are looking for disc-based games that are also available for download, pick the second option on this list ゲームコンテンツ(全て)(all game content)]
Now you can browse through all the full PS3 games you can buy on the Japanese PSN. [*Note: You can do the same basic step for the Vita and PSP catalogs as well since they are organized identically.]
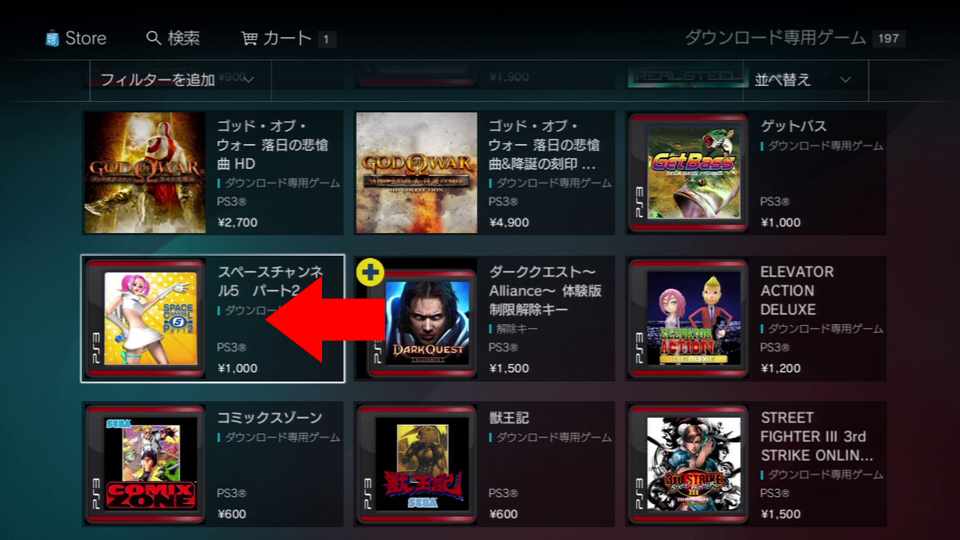 Step 5: To buy one, simply select the icon of the game you want to buy.
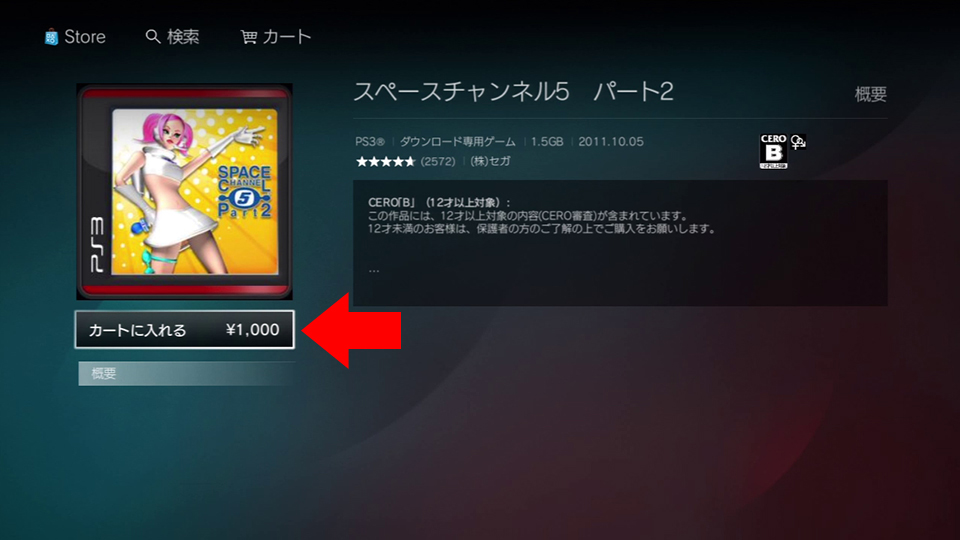 Step 6: Then, in the new window, click the top option to add it to your cart.
 Step 7: Select the bottom option in the next window to pay.
 Step 8: Now select the top option ダウンロード (download) to download your new game.
Congratulations! Now you have a working Japanese PSN account and the knowledge to navigate the store. Enjoy! 😉 🙂
Many Thanks to Richard Eisenbeis 🙂
Freelance Video Games Journalist
[Kotaku, GamePro, GameZone)